1. Introduction to Christmas Cookie Challenge Recipes
Holiday baking is undeniably one of the highlights of the festive season. Accordingly, folks gather in warm kitchens, dust sugar over gleaming cookie dough, and savor the aroma of seasonal treats. Christmas Cookie Challenge recipes have become an integral part of many family traditions. Indeed, they transform ordinary flour and butter into delightful confections that spark immense joy. Moreover, they provide a creative outlet for all ages, because decorating and customizing festive cookies can be both relaxing and exciting.
Tate’s Bake Shop Chocolate Chip Cookie Clone RecipeAltogether, the Christmas Cookie Challenge recipes phenomenon taps into nostalgia while simultaneously inspiring innovative cookie decorating ideas. Furthermore, participants and viewers alike enjoy exploring new shapes, flavors, and decorative flair that brighten cookie trays. Consequently, these sweet gems bring people closer during the busy month of December. Also, the variety is remarkable, ranging from classic gingerbread cookies to whimsical sugar cookies, which can be decked with sprinkles or sugary drizzles.
Notwithstanding their timeless appeal, these celebratory morsels continue to evolve. Therefore, you might find new designs like reindeers, penguins, and even cookie forests—reminding us that creativity knows no bounds. When families gather, these Christmas desserts become edible memories, forging a bond that lingers long after the last crumb is enjoyed.
Overview of the Christmas Cookie Challenge Recipe Show
The Christmas Cookie Challenge Recipes Show is a spirited competition that airs on Food Network, where talented bakers from different backgrounds come together to craft astounding cookies. Initially introduced to spotlight the imaginative side of holiday sweets, it has grown into a fan-favorite event that keeps viewers glued to their screens.
Concept and Format
Basically, the show tasks contestants with creating dazzling Christmas confections under tight time constraints. Each episode features multiple rounds designed to test everything from taste to artistry. Despite the pressure, bakers whip up creations that cleverly balance flavor and flair, simultaneously vying for the coveted title. Furthermore, professional judges offer tips, feedback, and comedic relief—turning the program into a lively learning experience for the audience.
Popularity and Audience Appeal
Evidently, the show’s popularity stems from its wholesome entertainment, because families can watch together and root for their favorite baker. Altogether, it appeals to lovers of festive recipes, novices who want baking tips, and seasoned pros looking for design inspiration. Additionally, the show’s fun atmosphere encourages aspiring bakers to try new techniques at home.
Significance of Christmas Cookies in Holiday Traditions
Cookies hold a special place in winter festivities, and Christmas Cookie Challenge recipes emphasize why. Despite shifting trends, cookies remain the centerpiece at many gatherings.
Historical Background
Historically, gingerbread cookies and spiced pastries date back centuries, chiefly popularized in Europe. Holiday traditions often included cookies shaped like animals or stars. Eventually, these customs spread globally. Before long, they found a permanent home in family kitchens everywhere.
Cultural Variations
Equally, every culture adds its own spin to holiday baking. For instance, Swedish pepparkakor, German lebkuchen, and Mexican wedding cookies all share the idea of sweet celebration, albeit with distinct local flavors. Certainly, Christmas Cookie Challenge episodes sometimes highlight these international twists, showcasing the diverse ways people enjoy seasonal treats.
2. Top Christmas Cookie Challenge Recipes
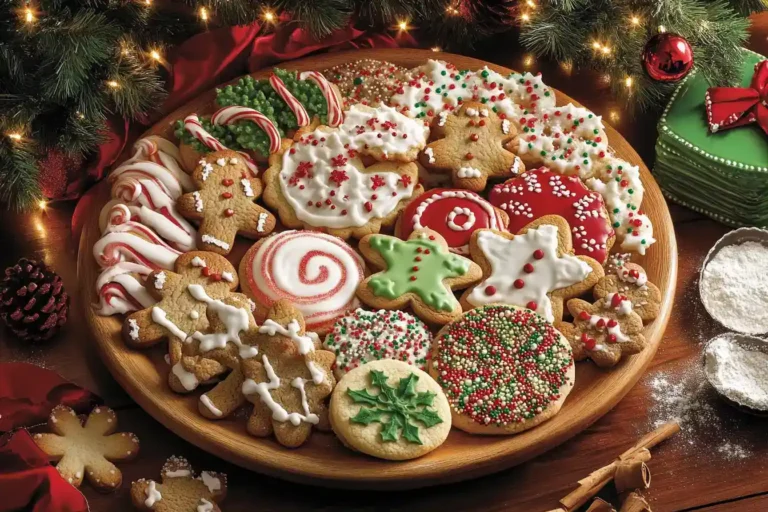
Are you ready for an incredible cookie exchange brimming with flavor, creativity, and plenty of holiday spirit? Christmas Cookie Challenge recipes, in all their sugary glory, offer limitless ideas for anyone looking to amp up their holiday traditions. Comparatively, these confections combine sweet aromas, colorful decorations, and memory-making moments that even Santa himself would applaud. Consequently, we’ve curated the top 10 recipes that not only taste amazing but also dazzle visually. Festive cookies unite families, neighbors, and friends, and this comprehensive list will guide you step by step. Henceforth, get your mixing bowls and sprinkles ready, because we’re diving straight into the most magical holiday desserts imaginable.
Before we start, feel free to check out Delish’s holiday cookie collection for extra inspiration and mouthwatering pictures of seasonal treats. Now, let’s begin our delicious countdown!
Recipe 1: Gingerbread Reindeer Cookies
Traditionally, gingerbread cookies in classic shapes delight everyone. However, turning them into quirky reindeer elevates your festive recipes to brand-new heights. Certainly, the spicy aroma of molasses and ginger is a hallmark of holiday baking, and this version offers a delightful twist.
Ingredients and Measurements
- 3 cups all-purpose flour
- 1 tablespoon ground ginger
- 1 tablespoon ground cinnamon
- ¼ teaspoon ground nutmeg
- ½ teaspoon baking soda
- ¼ teaspoon salt
- ½ cup unsalted butter, softened
- ½ cup brown sugar
- ½ cup molasses
- 1 large egg
- 1 teaspoon vanilla extract
Step-by-Step Preparation Guide
- Combine Dry Ingredients: Initially, whisk together the flour, ginger, cinnamon, nutmeg, baking soda, and salt in a large bowl.
- Cream Butter and Sugar: Using an electric mixer, beat the butter and brown sugar till fluffy. Then, mix in the molasses, egg, and vanilla, ensuring everything is well incorporated.
- Form the Dough: Add the dry mixture gradually. Consequently, a firm dough will form.
- Chill: Wrap the dough in plastic wrap, and chill it for at least one hour.
- Roll and Cut: Next, roll the dough on a floured surface to about ¼-inch thickness. Also, use a reindeer-shaped cookie cutter (or simply cut out gingerbread men and flip them upside down so the legs become antlers!).
- Bake: Place shapes on a parchment-lined baking sheet, and bake at 350°F for around 8–10 minutes.
Decorating Tips and Tricks
- Cookie decorating ideas: Pipe antlers and eyes with royal icing, and place a red candy nose for that unmistakable Rudolph look.
- For extra sparkle, dust some edible glitter around the antlers.
- Alternatively, give each reindeer a festive scarf using colored icing.
Recipe 2: Holiday Swirled Sugar Cookies
Sugar cookies are a cherished staple. Nonetheless, swirling red and green food coloring into the dough creates a striking, merry pattern that brightens any table. Moreover, they’re simple to prepare, making them perfect for a quick but impressive holiday sweets project.
Ingredients and Measurements
- 2 ¾ cups all-purpose flour
- 1 teaspoon baking powder
- ¼ teaspoon salt
- 1 cup unsalted butter, softened
- 1 ½ cups granulated sugar
- 1 large egg
- 2 teaspoons vanilla extract
- Red and green gel food coloring (around 2–3 drops each)
Step-by-Step Preparation Guide
- Start with Dry Mix: First, stir together flour, baking powder, and salt in a bowl.
- Cream Butter and Sugar: Secondly, beat the butter and sugar until the mixture is light. Afterwards, incorporate the egg and vanilla.
- Mix in the Flour: Gradually add the flour mixture to form a soft dough.
- Divide and Color: Split dough into three parts. Color one part red, one part green, and leave the remaining portion plain.
- Swirl Effect: Roll out each portion into a rectangle, stack them up, then roll into a log. Equally, twist the dough gently for a more pronounced swirl.
- Slice and Bake: Chill the log for 30 minutes. Then, slice the cookies about ¼-inch thick and bake at 350°F for 8–10 minutes.
Decorating Tips and Tricks
- Drizzle melted white chocolate on top to enhance the vibrant swirl.
- Alternatively, sprinkle crushed candy canes to add crunch and a minty kick.
- Wrap these cookies in cellophane for a colorful gift idea during a cookie exchange.
Recipe 3: Penguin Slice-and-Bake Cookies
Despite many whimsical shapes in holiday baking, penguins evoke extra fun, especially with kids who adore them. Certainly, these charming characters bring personality to your Christmas confections.
Ingredients and Measurements
- 2 ½ cups all-purpose flour
- ½ teaspoon baking soda
- ¼ teaspoon salt
- 1 cup unsalted butter, softened
- ¾ cup powdered sugar
- 1 large egg
- 1 teaspoon vanilla extract
- Black food coloring gel
- Orange food coloring gel (optional, or you can just add an orange icing later)
Step-by-Step Preparation Guide
- Whisk Dry Ingredients: In a medium bowl, combine flour, baking soda, and salt.
- Cream and Blend: Cream butter and powdered sugar until fluffy. Then, beat in the egg and vanilla.
- Divide Dough: Split the dough into two or three portions. Color part of the dough black to form the penguin body, and keep one portion white for the tummy. If desired, color a small piece orange for the beak and feet.
- Roll Log: Form the black dough into a log, then press the white dough down the center. Similarly, attach orange dough bits where the beak and feet should go.
- Chill: Wrap tightly in plastic and chill for 1 hour.
- Slice and Bake: Cut into slices, about ¼ inch thick, and bake at 350°F for 9–11 minutes.
Decorating Tips and Tricks
- Use black or dark brown icing to outline details if the penguin shape looks fuzzy.
- Apply tiny candy eyeballs after baking for a cartoonish effect.
- Keep some baking tips in mind: do not overbake or the edges might brown, dulling that crisp black-and-white contrast.
Recipe 4: No-Bake Oreo Truffle Snowmen
No oven? No problem. No-bake cookies deliver scrumptious indulgence without preheating anything. Accordingly, these Oreo truffle snowmen are consistently a crowd favorite.
Ingredients and Measurements
- 36 Oreo cookies (classic version)
- 8 oz cream cheese, softened
- 1 teaspoon vanilla extract
- 12 oz white melting chocolate
- Mini chocolate chips or black icing for eyes
- Orange sprinkles or candy for noses
Step-by-Step Preparation Guide
- Crush Cookies: Blitz Oreos in a food processor until finely ground.
- Mix with Cream Cheese: Transfer crumbs to a bowl and combine with cream cheese and vanilla extract. Soon, you’ll have a thick paste.
- Form Truffles: Roll tablespoonfuls of mixture into balls. Chill them for 15 minutes.
- Coat in White Chocolate: Melt the chocolate. Dip each chilled truffle to create a smooth outer layer.
- Build Snowmen: Stack two coated truffles to form a head and body, using extra melted chocolate as glue.
- Decorate: Place mini chocolate chips for eyes and an orange candy for a carrot nose.
Decorating Tips and Tricks
- If your white chocolate thickens, add a small spoonful of coconut oil to keep it smooth.
- You can also pop a lollipop stick in the top truffle, turning each piece into a whimsical snowman pop.
- Because these are rich, smaller sizes tend to be more manageable for guests.
Recipe 5: Christmas Tree Cookie Forest
A Christmas Tree Cookie Forest brings the spirit of holiday traditions to your dessert table. Markedly, kids and adults both marvel at the sight of cookie “trees” displayed upright.
Ingredients and Measurements
- 3 cups all-purpose flour
- ½ teaspoon baking powder
- ½ teaspoon salt
- 1 cup unsalted butter, softened
- 1 ¼ cups granulated sugar
- 1 large egg
- 1 teaspoon almond extract (optional)
- Green gel food coloring
Step-by-Step Preparation Guide
- Combine Dry Ingredients: Mix flour, baking powder, and salt.
- Cream Butter and Sugar: Beat butter and sugar for about 2 minutes. Afterward, add the egg and almond extract.
- Form Dough: Stir in the flour mixture. Add green food coloring to reach your desired hue.
- Cut Tree Shapes: Roll dough to ¼ inch thickness and cut out graduated tree shapes (small, medium, large).
- Bake: Place on a lined baking sheet and bake at 350°F for 8–10 minutes, or until edges are lightly golden.
Decorating Tips and Tricks
- Stack different sizes of baked trees using royal icing or chocolate as glue, forming a “forest” centerpiece.
- Dust powdered sugar on top, creating a snowy effect.
- Use silver dragees or star-shaped sprinkles to mimic ornaments.
Recipe 6: Eggnog Blossoms
Eggnog is a classic festive drink. But turning that flavor into a blossom cookie offers a new dimension in Christmas desserts. Consequently, these blossoms exude sweet, creamy undertones paired with a gentle spice.
Ingredients and Measurements
- 2 ¼ cups all-purpose flour
- 1 teaspoon baking powder
- ½ teaspoon ground nutmeg
- ¼ teaspoon salt
- ½ cup unsalted butter, softened
- ¾ cup granulated sugar
- 1 large egg
- ½ cup eggnog
- 1 teaspoon rum extract (non-alcoholic flavoring)
- 24 chocolate kisses (unwrapped)
Step-by-Step Preparation Guide
- Prep Dry Components: Whisk flour, baking powder, nutmeg, and salt in a bowl.
- Cream and Combine: Cream butter and sugar. Then, beat in the egg, eggnog, and rum extract.
- Integrate Dry Mix: Gradually incorporate the flour mixture to form a sticky dough. Chill for 30 minutes.
- Shape and Bake: Roll dough into 1-inch balls. Place on a parchment-lined tray, and bake at 350°F for 10–12 minutes.
- Add Chocolate Kiss: Immediately press a chocolate kiss into each cookie.
Decorating Tips and Tricks
- Sprinkle extra nutmeg on top for a warm, fragrant finish.
- Drizzle a thin line of white chocolate over the kisses for a festive accent.
- Store in an airtight container, because these cookies stay fresh for up to a week.
Recipe 7: Gingerbread in Hot Cocoa Tubs
If you want your guests to experience a moment of “Aww!” then treat them to tiny gingerbread men soaking in “hot cocoa.” Comparatively, this concept might look intricate, but it’s easier than it seems.
Ingredients and Measurements
- 2 ¾ cups all-purpose flour
- 1 tablespoon ground ginger
- 1 tablespoon ground cinnamon
- ½ teaspoon baking soda
- ¼ teaspoon salt
- ½ cup unsalted butter, softened
- ½ cup brown sugar
- ½ cup molasses
- 1 large egg
- 1 cup melted chocolate (milk or dark)
- Mini marshmallows
Step-by-Step Preparation Guide
- Sift Dry Ingredients: Combine flour, ginger, cinnamon, baking soda, and salt.
- Mix Wet: Cream butter and brown sugar. Add molasses and egg.
- Form Dough: Stir the dry ingredients into the wet until well blended. Chill for 1 hour.
- Cut Gingerbread Men: Roll out dough, then use a small gingerbread-man cutter. Bake at 350°F for 7–9 minutes.
- Create Cocoa Cup: Fill a small cup or shot glass half-full with melted chocolate. Place a gingerbread man so it appears to be “soaking” in chocolate.
- Marshmallow Topping: Drop mini marshmallows into the chocolate around the gingerbread man. Let set.
Decorating Tips and Tricks
- Pipe tiny smiles and swimsuits on the gingerbread men for comic effect.
- Because the chocolate sets quickly, add marshmallows immediately.
- Present them in clear cups for maximum visual impact.
Recipe 8: Snow Globe Cookies
Snow globe cookies combine crisp sugar cookie bases with transparent candy centers that resemble real snow globes. Certainly, these are showstoppers, albeit slightly more advanced in baking techniques.
Ingredients and Measurements
- 3 cups all-purpose flour
- 1 teaspoon baking powder
- ½ teaspoon salt
- 1 cup unsalted butter, softened
- 1 cup granulated sugar
- 1 large egg
- 1 teaspoon vanilla extract
- Hard clear candies (like clear mints or isomalt chips)
- Royal icing for decorations
Step-by-Step Preparation Guide
- Whisk Dry Components: Combine flour, baking powder, and salt.
- Cream Butter and Sugar: Mix until fluffy. Then, add the egg and vanilla extract.
- Form Dough: Blend in the flour mixture. Roll the dough to about ¼-inch thickness.
- Cut Shapes: Use two round cookie cutters—one larger for the outside and another smaller to cut out the center. This center will be replaced by a melted candy disc.
- Bake with Candy: Place the shaped dough on a tray lined with parchment. Put a hard candy in each center. Bake at 350°F for 8–10 minutes. The candy will melt and form a glass-like panel.
- Cool: Let cookies cool completely to solidify the candy window.
Decorating Tips and Tricks
- Use royal icing to draw tiny snowmen, trees, or stars on the candy “windows.”
- Spritz edible glitter on the candy for extra sparkle.
- Hang them like ornaments by punching a small hole near the top before baking.
Recipe 9: Santa Skillet Cookie
A skillet cookie is a shareable dessert that embodies comfort. Still, it can be decked out with a Santa theme for that extra dash of cheer. Cookie decorating ideas abound here!
Ingredients and Measurements
- 2 ¼ cups all-purpose flour
- 1 teaspoon baking soda
- ½ teaspoon salt
- 1 cup unsalted butter, melted
- 1 cup light brown sugar, packed
- ½ cup granulated sugar
- 2 large eggs
- 2 teaspoons vanilla extract
- 1 cup semi-sweet chocolate chips
- Red sprinkles or red icing for Santa’s suit
- White icing for trim
Step-by-Step Preparation Guide
- Combine Dry Ingredients: Stir together flour, baking soda, and salt.
- Mix Wet: In another bowl, whisk melted butter, brown sugar, and granulated sugar until smooth. Then, add eggs and vanilla.
- Fold in Dry Mix: Combine the dry ingredients with the wet until just mixed. Stir in chocolate chips.
- Bake in Skillet: Spread dough in a greased cast-iron skillet. Bake at 350°F for 20–25 minutes, or until the center is just set.
- Cool Slightly: Let cool for 5 minutes, so the center remains gooey.
Decorating Tips and Tricks
- Use red icing to create Santa’s suit across half the cookie surface.
- Pipe white icing for his beard and fur trim.
- Slice it like a pie so everyone gets a chunk of the Santa design.
Recipe 10: Peppermint Meringues
Light, airy, and refreshingly minty, peppermint meringues offer a final flourish to your holiday sweets. Because they’re low in calories and big on festive color, they shine as a guilt-free nibble.
Ingredients and Measurements
- 3 large egg whites, at room temperature
- ¾ cup granulated sugar
- ¼ teaspoon cream of tartar
- ¼ teaspoon salt
- ½ teaspoon peppermint extract
- Red gel food coloring
Step-by-Step Preparation Guide
- Whip Egg Whites: In a clean metal bowl, begin beating egg whites on low. Add cream of tartar and salt.
- Gradually Add Sugar: Increase speed to medium and slowly add sugar. Then, go to high speed and whip until stiff peaks form.
- Flavor and Color: Gently fold in peppermint extract. Additionally, add red gel coloring by drawing vertical stripes inside your piping bag so the meringues emerge with a candy-cane swirl.
- Pipe and Bake: Pipe small kisses onto a parchment-lined sheet. Bake at 200°F for about 1½ hours, then turn off oven and let them rest inside for 30 minutes.
Decorating Tips and Tricks
- Dip the bottoms in melted chocolate for extra sweetness.
- Sprinkle crushed peppermint candies on top for added texture.
- Store in a dry container, or humidity might soften their crispness.
By tackling these Top 10 Christmas Cookie Challenge Recipes, you’ll undoubtedly become the champion of your own holiday baking extravaganza. Above all, each recipe has room for personalization—consider new shapes, different icing colors, or playful candy garnishes. Altogether, these seasonal treats transform your kitchen into a wonderland of flour-dusted counters and sugar-coated bliss. Meanwhile, you can share the joy with neighbors, bring them to parties, or simply relish them with a hot mug of cocoa. Indeed, your holiday traditions will never be the same once you embrace the fun, creativity, and heartfelt delight that these recipes provide.
Remember, baking is as much an art as it is a science. Accordingly, tweak each recipe to match your tastes, especially if you prefer more spice, a different icing consistency, or alternative decorations. Whether you’re a novice or a seasoned home cook, these dazzling cookies will give you a reason to gather loved ones around the kitchen table. Enjoy every sweet, festive moment—straightaway start planning your next cookie masterpiece!
3. Tips and Techniques for Perfect Christmas Cookies
Creating festive cookies that taste amazing and look even better requires not only good recipes but also proper baking techniques and attention to detail. Consequently, following expert advice can elevate your holiday baking from routine to remarkable. Here, we’ll explore essential kitchen gear, common mishaps, and smart storage tips so your Christmas confections stay fresh throughout the holidays. Albeit some minor challenges might arise, you’ll be prepared to conquer them and produce dazzling seasonal treats every time.
Essential Baking Tools and Equipment
Firstly, a well-equipped kitchen simplifies your baking experience. Measuring cups and spoons are vital for accuracy, because cookies rely on precise ratios of dry and wet ingredients. Meanwhile, a kitchen scale helps you weigh flour and sugar consistently, thereby preventing dense or dry dough.
Mixing bowls are another must-have, especially if you plan to decorate multiple doughs simultaneously. Likewise, a stand mixer or hand mixer reduces labor, allowing you to cream butter and sugar until it’s light and airy. Furthermore, cookie decorating ideas often require piping bags and icing tips to create intricate designs. You might even want a lazy Susan or turntable, so you can rotate your cookies for symmetrical icing patterns.
Moreover, parchment paper or silicone baking mats safeguard your pans against sticky residues. Also, a good rolling pin and cookie cutters in various shapes—stars, trees, reindeer—expand your creative range. Holiday traditions often call for more decorative shapes, so invest in cutters that match the season.
Common Mistakes to Avoid
Although baking cookies can be a breeze, several pitfalls frequently trip up even seasoned bakers. Overmixing the dough is one of the most common errors, notably causing tough and chewy outcomes rather than soft, crumbly textures. Therefore, mix your dough until the ingredients just come together.
Another culprit is not chilling the dough. Many gingerbread cookies and sugar cookies require at least 30 minutes in the fridge so the butter solidifies, helping cookies keep their shape during baking. Also, ensure your oven is fully preheated, and rotate baking sheets halfway through. Otherwise, the cookies might brown unevenly.
Whenever you want an even thickness—particularly for decorating tips—use rolling pin guides or two flat slats on either side of the dough. Accordingly, your cookies will bake uniformly. No-bake cookies eliminate oven timing concerns but still demand proper chilling to firm up.
Storage and Shelf-Life of Christmas Cookies
Storing your holiday sweets properly guarantees they remain fresh, crisp, and full of flavor. Place cooled cookies in airtight containers—separate soft and crisp varieties so textures don’t blend. Shortly after baking, stack them between sheets of parchment or wax paper to avoid sticking.
Moreover, if you’re sending a cookie exchange package or shipping them, pack them snugly with tissue paper or bubble wrap. Sugar cookies and similarly firm types can last around one to two weeks in a sealed container, while no-bake cookies and truffles often hold up to a week if kept cool.
For longer storage, freeze undecorated cookies in freezer-safe bags. When ready to serve, thaw them at room temperature, then add final touches like icing and sprinkles. Holiday desserts often taste just as delightful post-thaw, so you can plan your baking sessions well in advance. If you want further guidance on freezing techniques, visit Taste of Home’s Cookie Freezing Tips.
Altogether, a bit of strategy and the right equipment transform your holiday baking into a stress-free, joyful adventure. Surely, if you follow these tips, your festive recipes will shine as the centerpiece of your holiday festivities.
4. Frequently Asked Questions
People often wonder about the ins and outs of the Christmas Cookie Challenge—from top cookie choices to production details. Therefore, we’ve gathered answers to popular queries, so you’ll be well-informed and ready to whip up new festive cookies or tune in to see the latest holiday sweets showdown. Let’s dive into some of the most pressing questions.
What is the number 1 Christmas cookie?
In many households, sugar cookies rank first. Undeniably, these classics are easy to shape, decorate, and personalize, so they fit any theme or celebration. Also, gingerbread cookies come in a close second, especially because they embody the warmth of winter spices and can be transformed into gingerbread people, houses, or reindeers. Comparatively, peanut butter blossoms and chocolate chip cookies sometimes claim the top spot, albeit depending on the region or individual preference. Nevertheless, sugar cookies retain their widespread appeal thanks to their simplicity and decorative potential.
What is the newest season of Christmas Cookie Challenge recipes?
Food Network continues to release fresh seasons that showcase talented bakers, new ideas, and jolly energy. Previously, the show debuted around November each year, timed perfectly for the holiday season. To find the most up-to-date information on the current or upcoming season, check out Food Network’s Christmas Cookie Challenge page. They detail the latest air dates, competitor lineups, and behind-the-scenes peeks. Hence, fans stay informed about each sweet episode and can mark their calendars accordingly.
Will there be a Christmas Cookie Challenge recipes in 2024?
While official announcements might not be released too far in advance, the Christmas Cookie Challenge recipes has shown consistent popularity, with fans tuning in year after year. Altogether, there is a good chance Food Network will continue this holiday baking tradition in 2024. However, broadcast schedules can shift due to production timelines or unforeseen changes. So, if you’re eager to see new contestants battling it out with cookie decorating ideas, stay connected to Food Network’s official site or social media for real-time updates. Meanwhile, you can practice your own competition-worthy seasonal treats at home.
Where is Food Network’s Christmas Cookie Challenge recipes filmed?
Generally, the show is filmed in a professional studio kitchen in the United States, specifically designed for televised baking competitions. The exact filming location can vary from season to season. Nonetheless, the set provides ample space for bakers to craft their Christmas confections under timed conditions. Furthermore, the production includes custom lighting, large countertops, ovens, and baking stations arranged to accommodate multiple contestants working simultaneously. During each episode, judges and hosts circulate, offering insights and comedic banter to keep the spirit light.
Additionally, viewers often appreciate the vibrant, decorated stage that mirrors the excitement of holiday traditions. String lights, wreaths, and even faux snow help set the mood. Overall, the location’s festive ambiance, top-tier equipment, and supportive production crew merge to create a delightful experience for participants and watchers alike.
If you plan to visit a filming location or attend any live event, keep an eye on Food Network’s public announcements. Occasionally, behind-the-scenes tours or ticket opportunities arise, offering fans a firsthand look at how holiday sweets competitions come to life.
5. Conclusion
Recap of Key Points
During the holiday season, Christmas Cookie Challenge recipes truly showcase the creativity and warmth that define holiday traditions. We’ve explored diverse treats, from gingerbread cookies to no-fuss truffles, while also covering essential baking tips. Surely, each recipe presented a unique spin on festive cookies, and we highlighted best practices in equipment choices, dough handling, and storage. Correspondingly, you learned how to troubleshoot common mistakes so that your holiday baking journey runs smoothly.
Encouragement to Try the Recipes
If you’re ready to stir up some excitement, straightaway try your hand at these festive recipes. Gather loved ones, pull out your rolling pins, and whip up Christmas desserts that brighten the entire house. Undoubtedly, everyone will appreciate the enchanting shapes, cheerful colors, and tantalizing aromas. Moreover, each cookie you bake can become part of shared traditions for years to come. Whether you aim to replicate the show’s intricately decorated confections or prefer simpler no-bake cookies, you’ll contribute delicious memories to your holiday festivities.
Henceforth, let your inner pastry artist shine, because there’s no limit to what you can create with a dash of sugar, a sprinkle of imagination, and a cupful of holiday cheer. Happy baking, and enjoy spreading the cookie love!