Introduction and Overview
How to Make a Unicorn Theme Cake
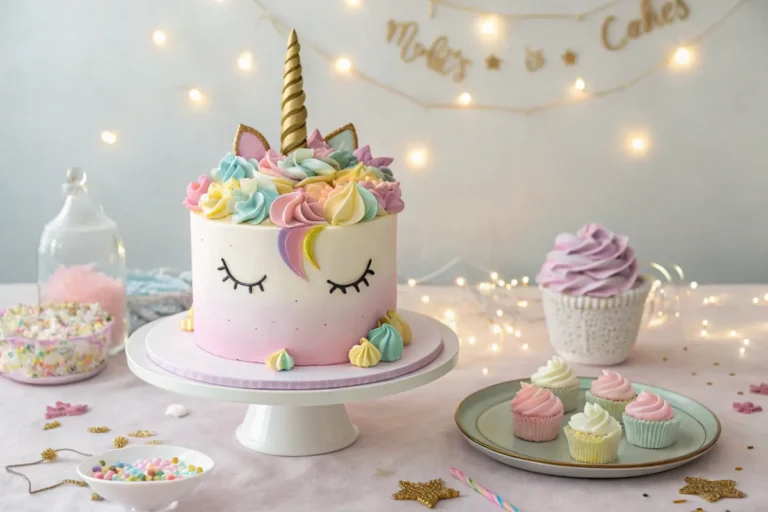
Unicorn-themed cakes are a total showstopper at any celebration. Indeed, these magical desserts instantly delight partygoers of all ages with their vibrant colors, whimsical decorations, and undeniable charm. Consequently, it’s no wonder that unicorn birthday cake ideas have soared in popularity. Basically, these cakes evoke a sense of wonder and fantasy that leaves everyone eagerly anticipating the first slice.
Before diving into the cake decorating techniques, it’s essential to understand the overall process. Altogether, creating this magical theme cake recipe can be broken down into a few straightforward steps. First and foremost, you’ll bake delicious cake layers in either vanilla or chocolate flavor, or both. Afterwards, you’ll whip up a dreamy buttercream or fondant frosting. Additionally, you’ll craft the signature unicorn horn and ears before assembling each dazzling detail into one cohesive masterpiece.
Furthermore, you’ll need a set of essential tools to get the job done well. Comparatively, you’ll find that piping bags and nozzles, cake pans, food coloring, and fondant-shaping tools are indispensable. Afterward, you’ll combine all these materials with edible decorations, like sprinkles and glitter, to evoke a fairytale effect. Henceforth, get ready to unleash your creativity while making a spectacular unicorn cake!
1. Tools, Materials, and Ingredients
Essential Tools for Making a Unicorn Cake
Planning on creating an enchanting centerpiece for your next gathering? Certainly, you’ll need the right equipment to make your DIY unicorn cake topper look dazzling. Firstly, grab two or three cake pans in the size you desire—6-inch or 8-inch rounds generally work well. Correspondingly, ensure they’re non-stick or line them carefully with parchment paper. Moreover, have sturdy piping bags and nozzles handy to achieve those gorgeous swirls of rainbow buttercream frosting.
Additionally, it’s crucial to include the necessary fondant tools, like smoothers and shaping sticks, so you can form the unicorn horn, ears, and any other whimsical designs. Another item you’ll want is a turntable (i.e., a revolving cake stand), because it helps in frosting the cake more uniformly. Likewise, keep a sharp cake-leveling knife or a serrated blade on hand for slicing away any uneven tops.
Meanwhile, a kitchen scale can be extremely helpful, particularly if you prefer precise measurements. Equally, you’ll require a few offset spatulas in varying sizes, so smoothing out every layer of frosting is a piece of cake—pun intended. Certainly, these tools will make your life simpler and your cake prettier.

Ingredients Needed for a Unicorn Cake
To fashion your magical theme cake recipes, assemble the following essentials:
- Cake Base Ingredients
- 3 cups all-purpose flour (or cake flour if you prefer a lighter crumb)
- 2 cups granulated sugar
- 1 cup unsalted butter (softened)
- 4 large eggs
- 1 cup whole milk (room temperature)
- 2 teaspoons baking powder
- 1 teaspoon salt
- 1 tablespoon vanilla extract (for a classic flavor)
- Frosting Materials
- 2 cups butter (softened)
- 8 cups powdered sugar
- 2–4 tablespoons heavy cream (adjust for consistency)
- Gel food coloring in multiple shades (pink, purple, blue, yellow, etc.)
- Edible glitter for cakes or luster dust
- Additional Decorations
- Fondant (white, plus any desired colors)
- Unicorn horn molds or a silicone cone mold
- Gold or silver metallic paint (edible)
- Sprinkles or confetti for added flair
Afterwards, make sure all your ingredients are room temperature before mixing, albeit certain recipes might suggest chilling your dough or fondant. Moreover, having food coloring on standby ensures you can customize every element, from pastel blues to vibrant pinks. Thus, you’ll be prepared to whip up a unicorn birthday cake idea that dazzles your guests.
2. Step-by-Step Cake Preparation
Preparing the Cake Base
To create scrumptious unicorn cake layers, you need a reliable recipe that produces light and tender results. Hence, here’s a detailed breakdown:
Fluffy Vanilla Cake Base:
- Preheat the Oven
- Initially, set your oven to 350°F (175°C). Before mixing any ingredients, ensure your oven is fully heated.
- Combine Dry Ingredients
- In a large mixing bowl, whisk together flour, baking powder, and salt. Subsequently, set this mixture aside.
- Cream Butter and Sugar
- In a separate bowl, beat softened butter and sugar on medium speed until light and fluffy (about 2–3 minutes). Eventually, add eggs one at a time, mixing well after each addition.
- Furthermore, pour in vanilla extract and blend.
- Alternate Wet and Dry
- Afterward, reduce mixer speed and alternate adding the dry mixture and milk in small portions, starting and ending with the dry ingredients. This method prevents lumps and ensures a smooth batter.
- Divide and Color (Optional)
- If you want rainbow cake layers, divide the batter into separate bowls and tint each portion with gel food coloring. Altogether, you can create 2–4 colors.
- Pour each colored batter into a prepared cake pan.
- Bake Evenly
- Place pans on the middle rack. Bake for 25–30 minutes or until a toothpick inserted in the center comes out clean.
- Thereafter, let the layers cool in their pans for around 10 minutes. Then transfer them onto a wire rack, allowing them to cool completely.
Baking Tips for Even Layers
- Tap each pan gently on the countertop to release any trapped air bubbles.
- Comparatively, rotating the pans halfway through baking helps ensure even browning.
- Before layering, check each cake layer’s height. If needed, trim with a serrated knife so each layer stacks neatly.
Assembling the Cake Layers
- Level the Layers
- Subsequently, use a cake leveler or large knife to trim any domed tops. Having flat surfaces makes stacking easier.
- Add Filling
- Place the bottom layer on a cake board or plate. Spread an even layer of buttercream (or any filling of your choice). Meanwhile, repeat this step for each additional cake layer.
- Secure the Layers
- Gently press down to keep everything stable. If your cake is tall or if you’re working in a warm environment, insert cake dowels for added support.
Tips for Perfect Cake Structure
- Notwithstanding the temptation to rush, let each layer rest a bit after adding the filling to prevent slippage.
- If you notice any wobble, concurrently add more dowels or apply a thicker crumb coat.
- Nevertheless, keep the environment cool since buttercream can soften quickly.
By following these steps, you’ll have a sturdy base for your unicorn-themed dessert. Surely, this foundation prepares you for the next exciting step: cake decorating techniques that transform a simple cake into a whimsical masterpiece.
3. Decorating Your Unicorn Cake
Frosting Techniques for a Unicorn Cake
Thirdly, once your cake layers are stacked, it’s time to dress them up with rainbow buttercream frosting. Although some people prefer a single-tone exterior, layering various pastel or vibrant hues is more visually striking. Here’s how to achieve these effects:
- Smooth Base Coat
- Apply a thin crumb coat all around the cake to lock in stray crumbs. Then, chill the cake for about 15–20 minutes.
- Subsequently, apply a second, thicker layer of buttercream. Use an offset spatula while rotating the cake on your turntable. This technique ensures a smooth finish.
- Rainbow Gradient
- Divide buttercream into separate bowls and color each one with gel food coloring.
- Simultaneously, fill piping bags fitted with large round or star tips.
- Pipe bands of colored frosting around the cake from bottom to top.
- Next, use a scraper or spatula to carefully blend the colors, creating a dreamy ombré or rainbow effect.
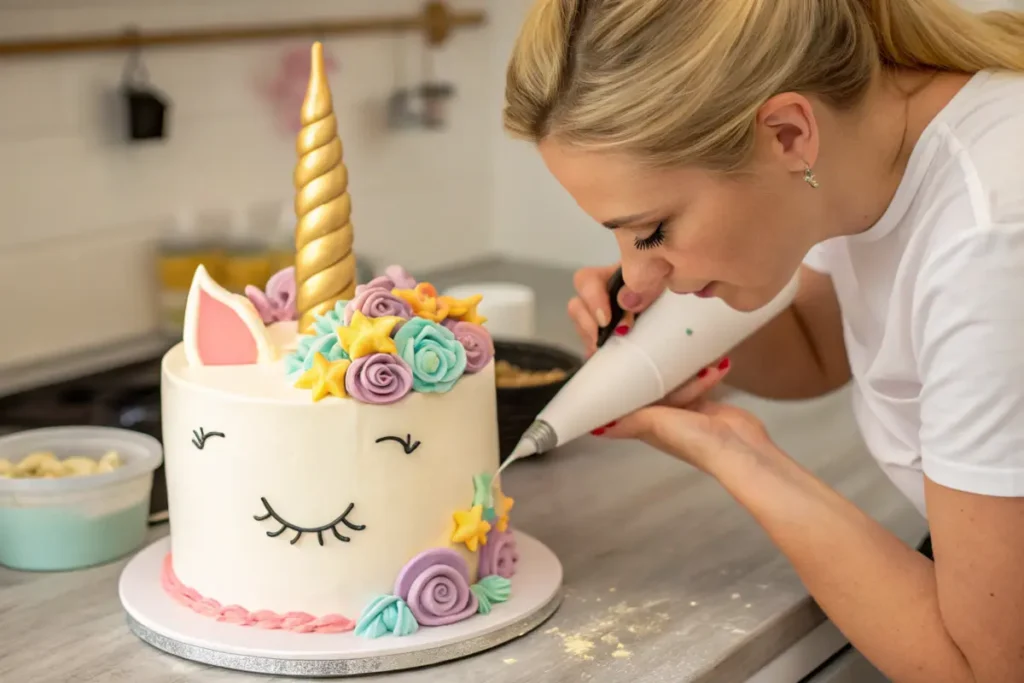
Adding Unicorn Features
Undoubtedly, a unicorn cake wouldn’t be complete without its signature horn, ears, and eyes. Concurrently, these small details bring the entire design to life.
How to Make a Unicorn Horn for the Cake
- Shape the Horn
- Roll out a piece of fondant or modeling chocolate into a long, tapered rope. Then, twist it gently to form a spiral shape.
- If you prefer a mold, press the fondant into the unicorn horn molds, remove carefully, and let it firm up.
- Afterward, insert a wooden skewer or toothpick to anchor the horn onto the cake later.
- Add Edible Glitter
- Paint the horn with edible gold or silver paint. Afterwards, dust it lightly with edible glitter for cakes or luster dust to enhance its shine.
- Let it dry completely in a cool, dry place so it retains its shape and color.
Crafting Unicorn Ears and Eyes
- Fondant Ears
- Cut out two ear shapes from white fondant.
- Insert a smaller piece of pink fondant inside each ear for a pop of color.
- Eventually, allow them to harden slightly so they’ll stand upright on the cake.
- Adorable Eyes
- Usually, unicorn eyes are depicted as closed, with long, curled eyelashes.
- Fill a piping bag with black buttercream. Carefully, pipe semicircles on the cake’s front where you want the eyes to be.
- Add tiny lashes by piping short lines upward from each semicircle.
Using Edible Glitter and Sprinkles
During the decorating process, sprinkles, confetti, or sugar pearls can intensify the cake’s fun factor. Specifically, scatter them around the base or accent the top to tie the design together. Occasionally, you can place them strategically to form patterns or shapes.
- Sprinkle a border along the bottom edge of the cake to conceal any imperfections.
- Lightly dust the entire cake with a pinch of glitter for a subtle shimmer.
- Conversely, go bold by covering an entire section of the frosting with colorful sprinkles.
By incorporating all these decorative elements, you’ll create a customizable cake idea for parties that mesmerizes everyone. Eventually, step back and marvel at your sparkly, magical theme cake recipe—it’s almost too pretty to eat!
4. Customizing for Special Occasions
Unicorn Cakes for Birthdays
When it comes to unicorn birthday cake ideas, the sky’s the limit. Henceforth, tweak the size or shape based on the number of guests, or even incorporate a tiered design for a grander display. During birthdays, add playful touches like:
- Personalized name plaques made from fondant.
- Metallic candles that match the horn color.
- The birthday person’s favorite color scheme.
Additionally, you can embed candy surprises between layers for a hidden treat. Evidently, each little detail creates a memorable experience. If children are involved, chiefly, ensure the design is both fun and safe by opting for edible decorations whenever possible.
Creating Mini Unicorn Cupcakes
Comparatively, not everyone wants a large cake. Therefore, mini unicorn cupcakes are an adorable alternative for parties, baby showers, or anytime you need bite-sized treats. Here’s how to whip them up:
- Same Batter, Smaller Portions
- Use the same cake recipe from Part 3 but distribute the batter into cupcake liners.
- Bake for about 18–20 minutes, or until a toothpick comes out clean.
- Decorate with Horns and Ears
- Make mini fondant techniques for unicorn cake horns by rolling slender pieces of fondant.
- Craft tiny ears and attach them on top with buttercream.
- Add a Swirl of Buttercream
- Pipe a tall swirl on each cupcake using a star tip.
- Moreover, finish with edible glitter or mini sprinkles for maximum charm.
Comparatively, these cupcakes are perfect as party favors, particularly when arranged in pretty boxes or on a stunning dessert table. Eventually, guests will be delighted to grab a magical treat on their way out.
5. Presentation and Serving Tips
Arranging the Unicorn Cake for Display
Initially, transferring your completed fondant techniques for unicorn cake onto a decorative stand elevates its presence. Surely, choose a stand with a wide, sturdy base to support the weight. Furthermore, surround your creation with coordinating napkins, plates, or themed centerpieces. Equally, you can accent the cake’s base with fresh flowers or additional sprinkles.
- For an extra pop, place pastel balloons nearby.
- Align small bowls of matching candy around the cake for a colorful accent.
- Formerly, some would suggest random placement, but symmetrical decor often enhances the overall look.
Tips for Cutting and Serving the Cake
Let’s face it, slicing into a masterpiece is a bit nerve-racking. Nevertheless, follow these steps to keep it neat:
- Use a Hot Knife
- Dip a large knife into hot water, then dry it. Afterward, make each cut. Notwithstanding the extra step, it helps produce clean slices.
- Make Moderate Portions
- Unicorn-themed cakes can be quite sweet. Hence, cutting slightly smaller pieces ensures everyone gets just enough indulgence.
- Store Leftovers Properly
- Wrap any remaining slices in plastic wrap. Lastly, store them in an airtight container in the fridge. They’ll stay fresh for at least 2–3 days.
6. Frequently Asked Questions (FAQs)
How to Decorate a Cake to Look Like a Unicorn?
Explicitly, the trick is to include the essential features—horn, ears, and eyes—along with vibrant frosting. Identically, keep the color scheme cohesive by blending soft pastels or bright candy hues. Also, add edible glitter for cakes wherever you want a touch of sparkle.
How to Make a Unicorn Cake for a Birthday?
Making a unicorn-themed cake for birthdays is simpler than you think. Lest you run out of time, prepare the layers beforehand and freeze them. Afterwards, just focus on the decorating part. Also, consider personalizing with the birthday person’s favorite colors, or add special toppings like chocolate ganache. Certainly, top it off with festive candles or a sparkler to complete the birthday vibe.
What Size Should a Unicorn Cake Be?
Choosing the right size depends on the number of guests. Comparatively, a standard 8-inch round cake can serve 15–20 people. Alternatively, smaller 6-inch cakes serve fewer guests but still make a statement. Therefore, always plan accordingly to avoid running short or having too much leftover. Furthermore, keep in mind the cake’s height if you’re adding multiple layers.
How Do You Make a Unicorn Horn Cake?
Undoubtedly, focus on crafting a standout horn—roll your fondant or modeling chocolate into a tapered rope, twist it, and let it set. Then, paint it with edible metallic hues and dust with glitter. Subsequently, insert a skewer for stability and place it on top of the cake’s center. If you prefer a shortcut, basically, buy a pre-made unicorn horn topper.
Conclusion
Wrapping Up Your Unicorn Cake Journey
Altogether, you’ve discovered how to transform simple ingredients into a whimsical unicorn-themed creation that wows any crowd. Surely, the combination of fluffy cake layers, rainbow buttercream frosting, and enchanting accents like a glimmering horn and ears creates a dessert that’s both visually spectacular and scrumptiously satisfying.
Additionally, you’ve learned about the essential tools, recipe steps, and decorating know-how needed to bring this fantasy cake to life. Eventually, with a dash of creativity and a bit of patience, you’ll master the cake decorating techniques that make for an unforgettable centerpiece. Therefore, go ahead and customize your unicorn birthday cake ideas in any way that sparks joy—change up the colors, add surprise fillings, or top it with extra sprinkles.
Now, it’s your turn: gather your tools, whip up the batter, and confidently craft an awe-inspiring DIY unicorn cake topper! Certainly, every slice of this sweet showstopper will delight your guests and leave them asking for seconds. Enjoy the magical journey, and happy baking!